Whether you don’t have the budget for “the works” on your big day, don’t want the fuss of someone else doing your hair and makeup or have plenty of beauty skills of your very own, the DIY approach is a great option for modern brides and bridesmaids.
If you plan to create your own bridal look,you’ve almost certainly been subscribing to YouTube video tutorials, tearing inspiration out of magazines and turning your Pinterest habit into a fully fledged pinning addiction. But all of that research could be coming to an end, because we’ve got the perfect Big Day updo for you – and it’s ridiculously, blissfully easy to achieve.
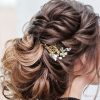
Combining the elegant simplicity of a low bun with the beauty and specialness of twists, volume and a sprinkling of sparkle, this versatile updo will look perfect worn down the aisle and beautiful on both brides and bridesmaids.
Here’s how it’s done…
Step #1: Add your extensions
If you want to achieve a more “amped up” look, with all the glamour which comes from extra volume, you’ll want to add hair extensions before creating your bun. Brush through your hair to remove any tangles, then clip in your hair extensions as usual. Not sure how to do that? Don’t panic, this guide to extensions will clear everything up.
Step #2: Curl it up
Time to add some texture and volume. To give your natural locks and your extensions some va-va-voom, use a curling wand to add loose curls and big body to your do. Wrap your hair around the curling wand from behind so that your curls fall away from your face to create a natural look.
Step #3: Backcomb and section
For even more volume and a flattering finished look, section off the hair at the crown of your head and gently backcomb it. Next, clip it out of the way while ready to wrap around your bun at the final stage. Pin back a section of hair from the side of your head which frames your face to include in this last step too.
Step #4: Build your bun
Gather your hair into a low ponytail before twisting the ponytail from the tip and pushing up from the end of the strand to create volume close to the nape of your neck. Wrap the full strand around itself to form a bun and pin it securely in place.
Step #5: Do the twist
Unpin the backcombed top section of leftover hair and twist this too (you could also plait for an even more romantic look). Wrap this twisted strand around the bun and pin it into place too. Finally, unpin the reserved side section of hair, twist it in an identical fashion and wrap it around the bun in the opposite direction from the backcombed strand before securing.
Et voila! A beautiful, easy and elegant updo! Add accessories for extra sparkle or drama, pop on a flower crown, customise anyway you please or leave as it is for a refined style.
Learn more about Car Service to Newark Airport from NYC newarkairportcarservice at newarkairportcarservice


