Who loves nail art? We love nail art!
That’s right; we’re talking about those super-chic and often intricate designs that adorn your tips. Whether you’re a nail art junkie or you’re simply looking to add a little extra something-something to your manicure, we’ve got seven great tips to help you achieve the perfect nail art look!
Table of Contents
What Is Nail Art?
Before we jump in and start sharing our nail art tips, let’s first answer the question: what is nail art?
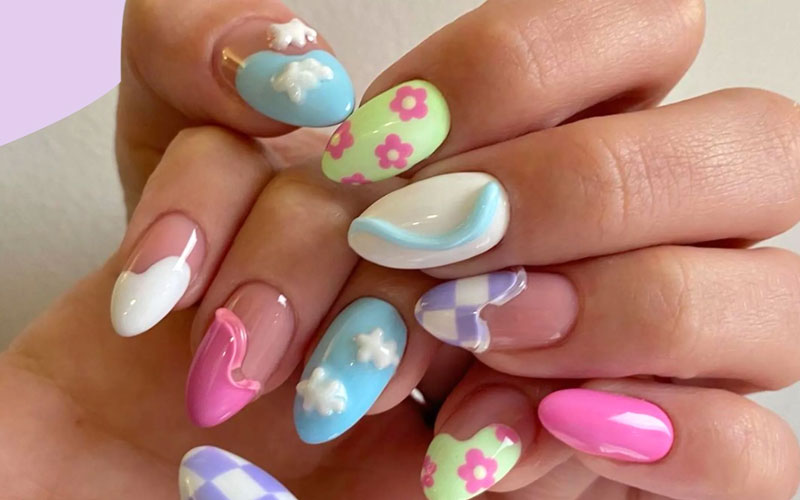
Nail art is simply the process of decorating your nails. This can be done in a number of ways using gel nail polish, including painting, drawing, stamping, and even using 3D embellishments. The sky is really the limit when it comes to nail art, and there are endless possibilities for designs.
Now that we’ve answered the question “what is nail art?” let’s move on to our seven tips for creating beautiful nail art designs.
1. Invest In A Good Quality Nail Art Brush
If you’re serious about nail art, then you’re going to need to invest in a good-quality nail art brush. This is especially important if you’re planning on doing any detailed work like painting or drawing.
A good nail art brush will have a fine tip that will allow you to create precise lines and designs. It’s also important to choose a brush that is made from soft, high-quality bristles so that it doesn’t damage your nails.
However, it’s worth noting that you don’t necessarily need to buy the most expensive nail art brush on the market. A mid-range option will likely suffice.
2. Use A Stencil
If you’re not confident in your freehand nail art skills, then a stencil can be a great way to help you achieve the look you’re going for. Simply place the stencil on your nail, and then use your nail polish to fill it in.
When using a stencil, it’s important to use a nail polish that is not too thick or too thin. You want the polish to be just the right consistency so that it doesn’t bleed under the stencil.
There are so many stencils s available on the market, so you’ll definitely be able to find one that suits your needs. And, if you don’t, you can always create your own!
3. Use A Toothpick
A toothpick can be a great tool for creating nail art designs, especially if you’re working with small details. Simply dip the toothpick into your nail polish, and then use it to create the design you desire.
The benefits of using a toothpick for nail art design is that you have more control over the nail polish, and you can create very small and precise details. Many people find nail art brushes to be too large for detailed work, so a toothpick can be a great alternative.
4. Practice, Practice, Practice
Like with anything else in life, practice makes perfect. If you want to nail that nail art design, then you’re going to need to put in the time and effort to practice.
Start by practicing on a piece of paper or cardboard. Once you feel confident enough, you can move on to your nails. And, don’t be afraid to make mistakes! It’s all part of the learning process.
If you want to go pro, then you might even consider investing in a nail art simulator. This is a tool that lets you practice your nail art designs on a fake nail so that you can perfect your technique before moving on to the real thing.
5. Have Fun With It
Nail art should be fun! After all, it’s just nail polish. So, don’t take yourself too seriously and have some fun with it. Designs like polka dots, stripes, and flowers are always popular, but feel free to get creative and come up with your own unique designs.
Experiment with different colours and designs too, and don’t be afraid to step outside of your comfort zone. The worst that can happen is you’ll end up with a nail art fail. But, even then, it’s not the end of the world. You can always try again.
6. Take Your Time
Much like practice, patience is also key when it comes to nail art. If you’re rushing, then you’re more likely to make mistakes. And, even if you don’t make any mistakes, hurrying will likely result in a design that is less than perfect.
So, take your time and relax while you’re doing your nail art. It’s not a race, so planning your designs before the nail polish hits your nail can save you a lot of time (and frustration!) in the long run.
7. Seek Inspiration
If you’re feeling stuck, then seek inspiration from others. There are so many talented nail artists out there, so find some looks that you like and try to recreate them.
Of course, you don’t want to copy someone else’s work exactly. But, using someone else’s design as a starting point can help you to create something that is uniquely your own.
Platforms like Pinterest and Instagram are great places to find nail art inspiration. Simply do a search for the type of design you’re looking for, and you’ll be sure to find plenty of ideas to help you get started.
Final Thoughts
There you have it – our seven nail art tips to help you achieve the perfect nail art design. Just remember to have fun with it, and don’t be afraid to experiment. After all, that’s half the fun!
So, next time you’re feeling creative, grab some nail polish and get to work. Your nails will thank you for it!

